HTML und CSS Frage?

Hallo,

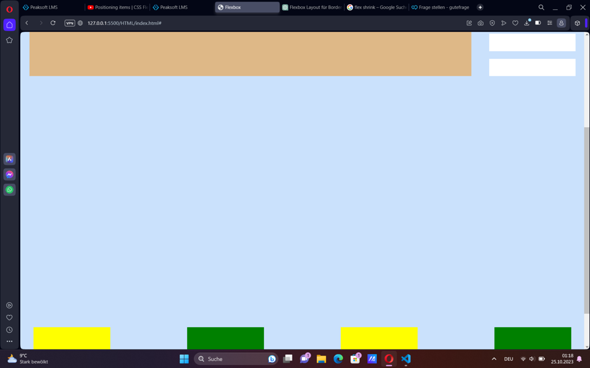
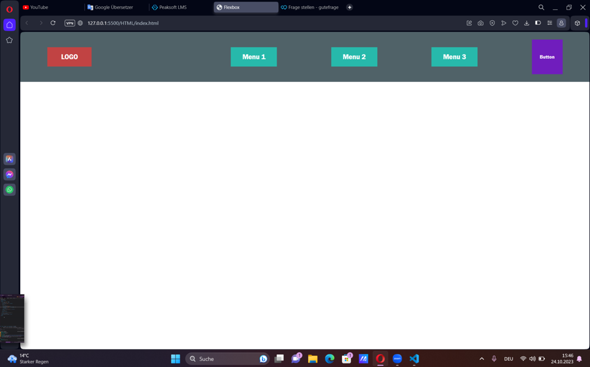
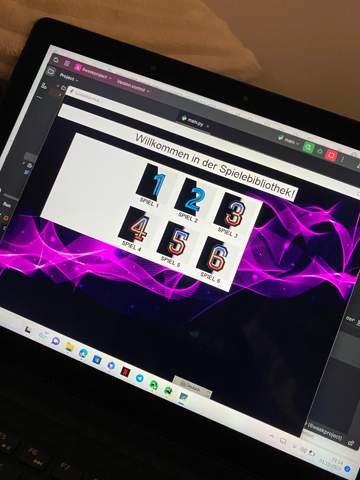
ich möchte die Grüne und gelbe Kärtchen im zweiten <section> nach oben in die MITTE schieben. Jedoch hakt es bisschen bei mir. Zudem müssen wir nur Flexbox benutzen das heisst kein margin oder position etc....

HTML_CODE:

<!DOCTYPE html>

<html lang="en">

<head>

  <meta charset="UTF-8">

  <meta name="viewport" content="width=device-width, initial-scale=1.0">

  <title>Flexbox</title>

  <link rel="stylesheet" href="../CSS/style.css">

</head>

<body>

  <header>

    <div class="layout2">

 <nav>

    <div class="container">

      <ul>

        <li>

          <a class="item1" href="#">LOGO</a>

          <a class="item" href="#">Menu 1</a>

          <a class="item" href="#">Menu 2</a>

          <a class="item" href="#">Menu 3</a>

          <a class="item2" href="#">Button</a>

        </li>

      </ul>

    </div>

  </nav>


</div>

</header>

<main>

  <div class="layout4">

  <section>


    <div class="laayout2">


      <div class="brownhelp"><div class="brownbox"></div></div>

      <div class="sectionone">

        <div class="content1">

          <div class="border"></div>

    <div class="border1"></div>

    <div class="border2"></div>

    <div class="border3"></div>

    <div class="border4"></div>

        </div>

  </div>

</div>

</section>

<section>

    <div class="laayout3">

  <div class="sectiontwo">

      <div class="content2">

        <div class="box"></div>

        <div class="box2"></div>

        <div class="box3"></div>

        <div class="box4"></div>


      </div>

    </div>

    </div>

</section>

</div>

</main>

</body>

</html>

CSS_CODE:

*{

  margin: 0;

  box-sizing: border-box;

}

header {

  background-color: #cae1fc;;

}

.layout2 {

  display: flex;

  align-items: center;

  justify-content: space-around;

  flex-direction: column;

}

.container {

  height: 150px;

  width: 1425px;

  background-color:rgb(80, 98, 104);

  display: flex;

  justify-content: space-around;

  align-items: center;

}

div ul {

  width: 100%;

}

div li {

  display: flex;

   justify-content: space-around;

   align-items:center;

  list-style: none;

}

.item {

  background-color: rgb(39, 185, 171);

  width: 120px;

  height: 50px;

  color: #fff;

  font-weight: bold;

  font-family: 'Franklin Gothic Medium', 'Arial Narrow', Arial, sans-serif;

  font-size: large;

  display: flex;

  justify-content: center;

  flex-direction: column;

  text-align: center;

  text-decoration: none;


}

.item1 {

  background-color: rgb(193, 67, 67);

  width: 115px;

  height: 50px;

  color: #fff;

  font-weight: bold;

  font-family: 'Franklin Gothic Medium', 'Arial Narrow', Arial, sans-serif;

  font-size: large;

  display: flex;

  justify-content: center;

  flex-direction: column;

  text-align: center;

  text-decoration: none;

}

.item2 {

  background-color: rgb(112, 29, 189);

  width: 80px;

  height: 90px;

  color: #fff;

  font-weight: bold;

  font-family: 'Franklin Gothic Medium', 'Arial Narrow', Arial, sans-serif;

  font-size: small;

  display: flex;

  text-align: center;

  justify-content: center;

  flex-direction: column;

  text-decoration: none;

}

.layout2 > nav {

  height: 100vh;

}

nav {

  display: flex;

  align-items: flex-end;

  max-height: 170px;

}

/**/

.layout4 {

  background-color: #cae1fc;

}

.laayout2 {

  height: 1000px;

  display: flex;

  justify-content:space-around;

}

.sectionone {

  display: flex;

  justify-content: center;

  align-items: flex-end;

  max-height: 345px;

  width: 270px;


}

.content1 {

  display: flex;

  flex-direction: column;

  align-items: flex-end;

  gap: 20px;

  background-color: #cae1fc;;

}

.border {

  background-color: #fff;

  width: 225px;

  height: 45px;


}

.border1 {

  background-color: #fff;

  width: 225px;

  height: 45px;

}

.border2 {

  background-color: #fff;

  width: 225px;

  height: 45px;


}

.border3 {

  background-color: #fff;

  width: 225px;

  height: 45px;


}

.border4 {

  background-color: #fff;

  width: 225px;

  height: 45px;

}

.brownhelp {

  display: flex;

  align-items: flex-end;

  justify-content: center;

  max-height: 345px;

  width: 1200px;

}

.brownbox {

  background-color: burlywood;

  width: 1150px;

  height: 305px;


}

/*YELLOW*/

.laayout3 {

  display: flex;

  justify-content: space-around;

  align-items: flex-start;

  height: auto;


}

.sectiontwo {

  display: flex;

  width: 800px;

  justify-content: space-around;

  align-items: center;

}

.content2 {

  display: flex;

  justify-content: space-around;

  gap: 200px;

}

.box {

  background-color: yellow;

  width: 200px;

  height: 190px;

}

.box2 {

  background-color: green;

  width: 200px;

  height: 190px;

}

.box3 {

  background-color: yellow;

  width: 200px;

  height: 190px;

}

.box4 {

  background-color: green;

  width: 200px;

  height: 190px;

}

Bild zum Beitrag
HTML, Webseite, CSS, JavaScript, HTML5, Code, PHP, Programmiersprache, Webdesign, Webentwicklung, Frontend, Visual Studio Code
HTML/CSS?

Hallo,

ich möchte das container (das graue Box) ganz nach unten schieben. Aber es funktioniert nicht. ich habe schon align-items ausprobiert, justify-content aber es geht nicht(((((((. Vielleicht findet ihr einen Fehler in meinem Code. Bitte helft mir.

P.S Wir dürfen nicht margin, position etc. benutzen da diese Hausaufgaben nur mit Flexbox gemacht werden sollen (Unser aktuelles Thema).

CSS-CODE:

* {
    margin: 0;
    box-sizing: border-box;
}


.layout2 {
    display: flex;
    align-items: flex-end;
    justify-content: flex-end;
    flex-direction: column;
}


.container {
    height: 150px;
    width: 1425px;
    background-color: rgb(80, 98, 104);
}


.item {
    background-color: rgb(39, 185, 171);
    width: 120px;
    height: 50px;
    color: #fff;
    font-weight: bold;
    font-family: 'Franklin Gothic Medium', 'Arial Narrow', Arial, sans-serif;
    font-size: large;
    display: flex;
    justify-content: center;
    flex-direction: column;
    text-align: center;
}


.item1 {
    background-color: rgb(193, 67, 67);
    width: 115px;
    height: 50px;
    color: #fff;
    font-weight: bold;
    font-family: 'Franklin Gothic Medium', 'Arial Narrow', Arial, sans-serif;
    font-size: large;
    display: flex;
    justify-content: center;
    flex-direction: column;
    text-align: center;
}


.item2 {
    background-color: rgb(112, 29, 189);
    width: 80px;
    height: 90px;
    color: #fff;
    font-weight: bold;
    font-family: 'Franklin Gothic Medium', 'Arial Narrow', Arial, sans-serif;
    font-size: small;
    display: flex;
    text-align: center;
    justify-content: center;
    flex-direction: column;
}


.item3 {
    background-color: rgba(112, 29, 189, 0);
    width: 80px;
    height: 110px;
    display: flex;
    text-align: center;
    justify-content: center;
    flex-direction: column;
}


.box1 {
    background-color: burlywood;
    height: 150px;
    width: 900px;
    display: flex;
    justify-content: flex-start;
}

HTML-CODE:

<!DOCTYPE html>
<html lang="en">
  <head>
    <meta charset="UTF-8">
    <meta name="viewport" content="width=device-width, initial-scale=1.0">
    <title>Flexbox</title>
    <link rel="stylesheet" href="../CSS/style.css">
  </head>
  <body>
    <header>
      <div class="layout2">
        <nav>
          <div class="container">
            <ul>
              <li>
                <a class="item1" href="#">LOGO</a>
              </li>
            </ul>
          </div>
        </nav>
      </div>
    </header>
  </body>
</html>

DAnkeschön LG

HTML, Webseite, CSS, HTML5, Code, Programmiersprache, Webdesign, Webentwicklung, Frontend
HTML/CSS?

Hallo,

ich möchte Abstand nach unten, rechts, links beim header, aber ich darf nicht margin, position, gap etc. benutzen also nur flexbox (das ist ja auch unser aktuelles thema).

P.S. Es sollte am Ende wie auf Bild 2 aussehen

CSS-Code:

*{
 margin: 0;
 box-sizing: border-box;
}
.main {
 display: flex;
 justify-content: center;
}
.layout {
 display: flex;
 justify-content: center;
}
.container {
 height: 130px;
 width: 100%;
 background-color:rgb(80, 98, 104);
 display: flex;
 justify-content: space-around;
 align-items: center;
}
.item {
 background-color: rgb(39, 185, 171);
 width: 120px;
 height: 50px;
 color: #fff;
 font-weight: bold;
 font-family: 'Franklin Gothic Medium', 'Arial Narrow', Arial, sans-serif;
 font-size: large;
 display: flex;
 justify-content: center;
 flex-direction: column;
 text-align: center;
}
.item1 {
 background-color: rgb(193, 67, 67);
 width: 115px;
 height: 50px;
 color: #fff;
 font-weight: bold;
 font-family: 'Franklin Gothic Medium', 'Arial Narrow', Arial, sans-serif;
 font-size: large;
 display: flex;
 justify-content: center;
 flex-direction: column;
 text-align: center;
}
.item2 {
 background-color: rgb(112, 29, 189);
 width: 80px;
 height: 90px;
 color: #fff;
 font-weight: bold;
 font-family: 'Franklin Gothic Medium', 'Arial Narrow', Arial, sans-serif;
 font-size: small;
 display: flex;
 text-align: center;
 justify-content: center;
 flex-direction: column;
}
.item3 {
 background-color: rgba(112, 29, 189, 0);
 width: 80px;
 height: 110px;
 display: flex;
 text-align: center;
 justify-content: center;
 flex-direction: column;
}
.box1 {
 background-color: burlywood;
 height: 150px;
 width: 900px;
 display: inline;
 justify-content: flex-start;
 align-items: center;
 flex-direction: column;
 
}

Würde mich für schnelle Antworten freuen. Danke im Voraus!
LG

Bild zum Beitrag
HTML, Webseite, CSS, HTML5, Code, Programmiersprache, Webdesign, Webentwicklung, Frontend
flask: jinja2.exceptions.TemplateNotFound: index.html | Wie fixen?

Hallo zusammen,

nachdem ich jetzt Stunden, und zwar wirklich Stunden an nur einem, meiner Meinung nach unnötigem Problem gesessen habe, bitte ich nun um Hilfe.

Folgendes vorab: Nachdem ich die Datenbankkonfiguration ausgelagert habe, fing das Problem wieder an. Zuvor habe ich in die flask_app.py einfach folgendes eingetragen, was das Problem löste:

data = "Daten aus Python-Skript"

Ich persönlich arbeite mich ja in die Programmierung ein, habe aber das Gefühl, dass Flask irgendwie unnötig kompliziert ist. Aber das ist ja nicht wichtig.

Ich habe just for fun OpenAI mal über den Code laufen lassen: Zugegeben, ist das nicht die schlauste Option, aber nach 5 Stunden nur für diesen Code verzweifelt man doch etwas xD

Ich möchte Daten aus der Datenbank abrufen und auf der Webseite anzeigen lassen. Dazu existiert folgender Code:

Hauptverzeichnis/main.py:

from web.flask_app import app
from systm import main

if __name__ == '__main__':
    app.run(debug=True, host="0.0.0.0", port=5000)  # 5000 Standard

Hauptverzeichnis/systm/main.py:

from flask import Flask, render_template
from systm.d import create_db_connection

app = Flask(__name__)


# Datenbankverbindung initialisieren
db = create_db_connection()
cursor = db.cursor()


@app.route('/')
def display_data():
    # Hier können Sie Daten aus Ihrem Python-Skript abrufen
    cursor.execute("SELECT * FROM products")
    product_info = cursor.fetchall()

    # Diese Daten werden an die HTML-Datei übergeben
    return render_template('index.html', product_info=product_info)


# Route, um Produktinformationen anzuzeigen
@app.route('/products')
def display_products():
    # Informationen aus der Datenbank abrufen
    cursor.execute("SELECT * FROM products")
    product_info = cursor.fetchall()

    # Informationen an das HTML-Template übergeben und anzeigen
    return render_template('products.html', product_info=product_info)


if __name__ == '__main__':
    app.run(debug=True)

Hauptverzeichnis/systm/d.py:

import mysql.connector

def create_db_connection():
    db = mysql.connector.connect(
        host="",
        user="",
        password="",
        database=""
    )
    return db

Hauptverzeichnis/web/flask_app.py:

from flask import Flask, render_template
from systm.d import create_db_connection

app = Flask(__name__, template_folder='web/templates', static_folder='web/static')


# Deaktivieren des Template-Caching
app.jinja_env.auto_reload = True
app.config['TEMPLATES_AUTO_RELOAD'] = True
app.config['STATIC_AUTO_RELOAD'] = True


# Datenbankverbindung initialisieren
db = create_db_connection()
cursor = db.cursor()


@app.route('/')
def display_data():
    # Daten aus der Datenbank abrufen
    cursor.execute("SELECT * FROM products")
    product_info = cursor.fetchall()

    # Diese Daten werden an die HTML-Datei übergeben und angezeigt
    return render_template('index.html', product_info=product_info)

Hauptverzeichnis/web/templates/index.html :

<!DOCTYPE html>
<html lang="de">
<head>
    <meta charset="UTF-8">
    <title>Title</title>
    <link rel="stylesheet" type="style/css" href="{{ url_for('static', filename='style.css') }}">
</head>
<body>
    <h1>Produktinformationen</h1>
    <table>
        <tr>
            <th>Produktname</th>
            <th>Verschlüsselungstyp</th>
            <!-- Weitere Spalten hinzufügen -->
        </tr>
        {% for product in product_info %}
        <tr>
            <td>{{ product[0] }}</td>
            <td>{{ product[1] }}</td>
            <!-- Weitere Spalten hinzufügen -->
        </tr>
        {% endfor %}
    </table>
</body>
</html>
HTML, Webseite, HTML5, Programmiersprache, Python, Webentwicklung, Python 3, Flask
Wieso funktioniert meine "Browser Extension" nicht auf dieser Seite?

Mir ist unter Linux aufgefallen das ich gar nicht den Auto-Scroll von Windows habe in zb. Google Chrome wenn man auf das Mauspad klickt, nutze ich gerne und dachte mir als Challenge ohne Chat Gpt dass ich mal schnell probieren könnte ein eigenes zu programmieren.

Ich weiß da gibt es fertige Software und Extension's, die laufen ohne Probleme und Ressourcen sparender wahrscheinlich.

Hab das erst in einer Html Datei (Extension in "") gemacht zum testen dann in anderen Websites den JS Code in eine Konsole eingefügt und es funktioniert eigentlich ganz gut.

Das Problem ist das ich nicht verstehe wieso er nicht hier funktioniert https://www.tennon.io/ , mir fällt beim inspizieren nichts auf und es scheint mit Next JS umgesetzt zu sein.

<!DOCTYPE html>
<html lang="de">


<head>
    <meta charset="UTF-8" />
    <meta name="viewport" content="width=device-width, initial-scale=1.0" />
    <title>Auto Scroll Extension</title>
    <style>
        html {
            min-width: 100%;
        }
    </style>
</head>


<body>
    <script>
        /* Render Dummy Content, cursor change wont work with min-height */
        for (let i = 0; i < 1000; i++) {
            document.body.innerHTML += "Lorem Ipsum ";
        }
        const scrollSpeed_Up = -1;
        const scrollSpeed_Down = 1;
        const middlehalf = window.innerHeight / 2;
        let AutoScroll_Interval; /* Global acess */
        let isScrolling = false;
        let isScrollingUp = false; /* Default Scrolling Down, Prevent Errors */


        const ToggleScrolling = Enable => {
            if (Enable) {
                console.log("Auto Scroll Active");
                document.body.style.cursor = "all-scroll";
                AutoScroll_Interval = setInterval(AutoScroll, 1);
                isScrolling = true; /* Prevent Multiple Interval's */
            } else if (!Enable && isScrolling) {
                /* Stop Interval , Reset Cursor and Variables */
                console.log("Auto Scroll Stopped");
                document.body.style.cursor = "auto";
                clearInterval(AutoScroll_Interval);
                isScrolling = false;
            }
        }


        const AutoScroll = () => {
            /* Get Current Vertical Scroll Position : console.log(window.scrollY); */
            isScrollingUp ? window.scrollBy(0, scrollSpeed_Up) : window.scrollBy(0, scrollSpeed_Down);
        }


        window.addEventListener("mousemove", e => {
            e.clientY > middlehalf ? isScrollingUp = false : isScrollingUp = true;
        });


        /* Check if Scroll Button is Pressed */
        window.addEventListener("mousedown", e => {
            e.button === 1 && !isScrolling ? ToggleScrolling(true) : ToggleScrolling(false);
        });


        /* ############## IGNORE ##############
        Check if Client has reached Bottom
        const scrollableHeight = document.documentElement.scrollHeight - window.innerHeight;
        if (window.scrollY >= scrollableHeight) { 
            // Reached Bottom Code ... 
        } else {
            // Code ...
        }
        */
    </script>
</body>


</html>
Browser, Linux, HTML, IT, Webseite, JavaScript, Ubuntu, HTML5, Informatik, Programmiersprache, Webentwicklung, Frontend, React, node.js, React Native
Warum ist der Bildschirm weiß und warum wird das Spiel nicht angezeigt?

Der Code: <!DOCTYPE html>

<html lang="en">

<head>

    <meta charset="UTF-8">

    <meta name="viewport" content="width=device-width, initial-scale=1.0">

    <title>Snake</title>

</head>

<body>

    <div id="score">Score: 0</div>

    <canvas id="canvas" width="480" height="480"></canvas>

    <button id="startButton">Start Game</button>

    <script>

        let canvas = document.getElementById('canvas');

        let ctx = canvas.getContext('2d');

        let rows = 20;

        let cols = 20;

        let snake = [{ x: 19, y: 3 }];

        let food = { x: 4, y: 5 };

        let cellWidth = canvas.width / cols;

        let cellHeight = canvas.height / rows;

        let direction = 'LEFT';

        let foodCollected = false;

        let score = 0;

        let gameRunning = false;

        placeFood();

        document.getElementById('startButton').addEventListener('click', startGame);

        setInterval(gameLoop, 500); // Ändere die Zeitverzögerung auf 500 Millisekunden (0,5 Sekunden)

        update();

        function update() {

            if (gameRunning) {

                moveSnake();

                testGameOver();

                if (foodCollected) {

                    snake.unshift({ ...snake[0] });

                    foodCollected = false;

                }

            }

            draw(); // Rufe die draw-Funktion in jedem Frame auf

            requestAnimationFrame(update);

        }

        function moveSnake() {

            shiftSnake();

            if (direction === 'LEFT') {

                snake[0].x--;

            } else if (direction === 'RIGHT') {

                snake[0].x++;

            } else if (direction === 'UP') {

                snake[0].y--;

            } else if (direction === 'DOWN') {

                snake[0].y++;

            }

            if (snake[0].x === food.x && snake[0].y === food.y) {

                foodCollected = true;

                placeFood();

                increaseScore();

            }

        }

        function draw() {

            ctx.fillStyle = 'black';

            ctx.fillRect(0, 0, canvas.width, canvas.height);

            ctx.fillStyle = 'white';

            snake.forEach(part => add(part.x, part.y));

            ctx.fillStyle = 'yellow';

            add(food.x, food.y);

        }

        function testGameOver() {

            let firstPart = snake[0];

            let otherParts = snake.slice(1);

            let duplicatePart = otherParts.find(part => part.x === firstPart.x && part.y === firstPart.y);

            if (

                snake[0].x < 0 ||

                snake[0].x >= cols ||

                snake[0].y < 0 ||

                snake[0].y >= rows ||

                duplicatePart

            ) {

                placeFood();

                snake = [{ x: 19, y: 3 }];

                direction = 'LEFT';

                score = 0;

                updateScore();

                gameRunning = false;

                document.getElementById('startButton').textContent = 'Start Game';

            }

        }

        function placeFood() {

            let randomX = Math.floor(Math.random() * cols);

            let randomY = Math.floor(Math.random() * rows);

            food = { x: randomX, y: randomY };

        }

        function add(x, y) {

            ctx.fillRect(x * cellWidth, y * cellHeight, cellWidth - 1, cellHeight - 1);

        }

        function shiftSnake() {

            for (let i = snake.length - 1; i > 0; i--) {

                const part = snake[i];

                const lastPart = snake[i - 1];

                part.x = lastPart.x;

                part.y = lastPart.y;

            }

        }

        function increaseScore() {

            score++;

            updateScore();

        }

        function updateScore() {

            document.getElementById('score').textContent = 'Score: ' + score;

        }

        function startGame() {

            if (!gameRunning) {

                gameRunning = true;

                document.getElementById('startButton').textContent = 'Pause Game';

            } else {

                gameRunning = false;

                document.getElementById('startButton').textContent = 'Resume Game';

            }

        }

        document.addEventListener('keydown', keyDown);

        function keyDown(e) {

            if (gameRunning) {

                if (e.keyCode === 37) {

                    direction = 'LEFT';

                } else if (e.keyCode === 38) {

                    direction = 'UP';

                } else if (e.keyCode === 39) {

                    direction = 'RIGHT';

                } else if (e.keyCode === 40) {

                    direction = 'DOWN';

                }

            }

        }

    </script>

</body>

</html>

Bild zum Beitrag
HTML, programmieren, JavaScript
Wieso geht mein C# Code nicht mit Blazor?

Hallo, ich programmiere momentan eine WetterApp mit Blazor zur Übung und habe einen C# Code geschrieben, allerdings funktioniert da nichts. Kann mir wer helfen?

Hier mein C# Code

@if (weatherData != null)
{
    <h4>@weatherData.Name</h4>
    <p>Temperatur: @Math.Round(weatherData.Main.Temperature)°C</p>
    <p>Luftfreuchtigkeit: @weatherData.Main.Humidity%</p>
    <p>Windgeschwindigkeit: @weatherData.Wind.Speed km/h</p>
    <p>Wetter: @weatherData.Weather[0].Main</p>
}

@code{
    private string city;
    private WeatherData weatherData;


    private async Task CheckWeather()
    {
        string apiKey = "6958878b02398eb62a27936168c23c6";
        string apiUrl = "https://api.openweathermap.org/data/2.5/weather?units=metric&q=";

        using (HttpClient client = new HttpClient())
        {
            try
            {
                HttpResponseMessage response = await client.GetAsync($"{apiUrl}{city}&appid={apiKey}");


                response.EnsureSuccessStatusCode();

                string responseBody = await response.Content.ReadAsStringAsync();

                weatherData = Newtonsoft.Json.JsonConvert.DeserializeObject<WeatherData>(responseBody);
            }
            catch (HttpRequestException e)
            {
                Console.WriteLine($"Fehler: {e.Message}");
            }
        }
    }
    public class WeatherData
    {
        public string Name{ get; set; }
        public MainData Main { get; set; }
        public WindData Wind { get; set; }
        public WeatherCondition [] Weather { get; set; }
    }

    public class MainData
    {
        public double Temperature { get; set; }
        public int Humidity { get; set; }
    }

    public class WindData
    {
        public double Speed { get; set; }
    }
    public class WeatherCondition
    {
        public string Main { get; set; }
    }
}

Hier mein HTML Code:

<body class="backgroundimage">
    <div class="card">
        <div class="search">
            <button @onclick="CheckWeather">
                <img src="images/SuchIcon.png"/>
                <input type="text" placeholder="Search" spellcheck="false" id="cityInput" @bind="city">
        </div>
            </div>
            <div class="weather">
                <div class="center margin-top">
                    <img src="images/image1.png" width="200" height="200" style="opacity: 1" class="weather-icon"/>
                </div>
                <div>
                    <h1 class="temp">22°c</h1>
                </div>
                <div class="center">
                    <h2 class="city center margin-top">New York</h2>
                </div>
                <hr class="hr1 line1"/>
                <div id="imagesMain">
                    <img src="/images/image1.png" width="75" height="75" class="imageline "/>
                    <img src="/images/image1.png" width="75" height="75" class="imageline "/>
                    <img src="/images/image1.png" width="75" height="75" class="imageline " style="margin-left: 5px; margin-right: -5px;"/>
                    <img src="/images/image1.png" width="75" height="75" class="imageline " style="margin-left: 12px; margin-right: -10px;"/>
                    <img src="/images/image1.png" width="75" height="75" class="imageline " style="margin-left: 2px; margin-right: -14px;"/>
                </div>
                <div>
                    <p style="color:black;" class="line0 title margin-left ">Monday</p>
                    <p style="color:black;" class="line0 title margin-left ">Tuesday</p>
                    <p style="color:black;" class="line0 title margin-left ">Wednesday</p>
                    <p style="color:black;" class="line0 title margin-left ">Thursday</p>
                    <p style="color: black;" class="line0 title margin-left ">Friday</p>
                </div>
                <hr class="hr1 line"/>
                <div class="details">
                    <div class="col">
                        <img src="images/humidity.png"/>
                        <div>
                            <p class="speed">Humidity</p>
                            <p class="humidity">50%</p>
                        </div>
                    </div>
                    <div class="col">
                        <img src="images/wind.png"/>
                        <div>
                            <p class="speed">Wind Speed</p>
                            <p class="wind">15 km/h </p>
                        </div>
                    </div>
                </div>
            </div>
        </body>
    </html>

   Ich verstehe nicht weshalb mein ClickEvent nicht funktioniert und die Wetterdaten nicht angezeigt werden.

HTML, programmieren, C Sharp, Programmiersprache
Hilfe für c# code mit HTML &CSS in Blazor?

Hallo, ich möchte eine WetterApp programmieren mit Blazor und sitze jetzt schon 4 Tage an dem Problem mit C#, da ich keine Ahnung habe wo ich anfangen soll und generell neu bin und nicht ganz vertraut bin. Ich habe die WetterApp mit JavaScript programmiert, allerdings soll ich C# verwenden und nicht JavaScript deshalb brauch ich eure Hilfe! Kann mir wer dabei helfen einen C# Code zu schreiben, welcher dasselbe macht wie mein javaScript-Code:

1. Ich möchte das mein "SeachrIcon-Button" aus einem HTML-Code als Suchbutton fungieren kann, womit ich die einzelnen Städte suchen kann, damit mir dabei dann die Wetterdaten angezeigt werden.

2.

Ich möchte, dass dann die Bilder der zu den jeweiligen Wetter vorkommnissen angepasst werden, also die Wetter Daten sollen in der Console angezeigt werden aber nicht auf dem Display

Hier mein Html Code:

<body class="backgroundimage">


  <div class="card">
      <div class="search">
          <button><img src="/images/SuchIcon.png"></button>


              <input type="text" placeholder="Search" spellcheck="false" />
        
      
      </div>
  </div>
    
     
  <div class="weather"> 
      <div class="center margin-top">
      <img src="images/image1.png" width="200" height="200" style="opacity: 1" class="weather-icon" />
      </div>


     <div>
          <h1 class="temp">22°c</h1>
     </div>
      
      
      <div class="center">
          <h2 class="city center margin-top">New York</h2>
      </div>


          <hr class="hr1 line1" />

          <div id="imagesMain">
              <img src="/images/image1.png" width="75" height="75" class="imageline " />
              <img src="/images/image1.png" width="75" height="75" class="imageline " />
              <img src="/images/image1.png" width="75" height="75" class="imageline " style="margin-left: 5px; margin-right: -5px;" />
              <img src="/images/image1.png" width="75" height="75" class="imageline " style="margin-left: 12px; margin-right: -10px;" />
              <img src="/images/image1.png" width="75" height="75" class="imageline " style="margin-left: 2px; margin-right: -14px;"/>


          </div>

          <div>
           
              <p style="color:black;" class="line0 title margin-left ">Monday</p>
              <p style="color:black;" class="line0 title margin-left ">Tuesday</p>
              <p style="color:black;" class="line0 title margin-left ">Wednesday</p>
              <p style="color:black;" class="line0 title margin-left ">Thursday</p>
              <p style="color: black;" class="line0 title margin-left ">Friday</p>
             
           
          </div>

          <hr class="hr1 line" />

      <div class ="details">
          <div class="col">
              <img src="images/humidity.png"/>
              <div>
                  <p class="speed">Humidity</p>
                  <p class="humidity">50%</p>
                  
              </div>
          </div>
          <div class="col">
              <img src="images/wind.png" />
              <div>
                  <p class="speed">Wind Speed</p>
                  <p class="wind">15 km/h </p>
                 
              </div>

          </div>

      </div>
  </div>
  
   </body>

Im unteren Kommentar werd ich die restlichen Codes posten


HTML, CSS, JavaScript, C Sharp
WetterApp mit HTML, Css und C# über Blazor Server App?

Hallo undzwar bin ich neu in C# und möchte über die Blazor Server App eine Wetter-App programmieren, allerdings fehlt mir dazu noch der Code, da ich nicht weiß wie ich anfangen soll. Ich möchte dass mein "SearchIcon" welcher in HTML hinterlegt ist als suchbutton fungiert, damit ich die Städte suchen kann und über API möchte ich, dass mir dann die jeweiligen Temperaturen angegeben werden. Kann mir wer helfen und gegebenenfalls einen Code dafür geben.

Hier mein HTML code:

<body class="backgroundimage">

  <div class="card">

    <div class="search">

      <button><img src="/images/SuchIcon.png"></button>

     <input type="text" placeholder="Search" spellcheck="false"/>


    </div>

  </div>


  <div class="weather"> 

    <div class="center margin-top">

    <img src="images/image1.png" width="200" height="200" style="opacity: 1" class="weather-icon" />

    </div>

    <div>

      <h1 class="temp">22°c</h1>

    </div>


    <div class="center">

      <h2 class="city center margin-top">New York</h2>

    </div>

      <hr class="hr1 line1" />

      <div id="imagesMain">

        <img src="/images/image1.png" width="75" height="75" class="imageline "

        <img src="/images/image1.png" width="75" height="75" class="imageline "

        <img src="/images/image1.png" width="75" height="75" class="imageline " style="margin-left: 5px; margin-right: -5px;"

        <img src="/images/image1.png" width="75" height="75" class="imageline " style="margin-left: 22px; margin-right: -5px;"

        <img src="/images/image1.png" width="75" height="75" class="imageline " style="margin-left: 5px; margin-right: -14px;"

      </div>

      <div>


        <p style="color:black;"class="line0 title margin-left ">Monday</p>

        <p style="color:black;"class="line0 title margin-left ">Tuesday</p>

        <p style="color:black;"class="line0 title margin-left ">Wednesday</p>

        <p style="color:black;"class="line0 title margin-left ">Thursday</p>

        <p style="color: black;"class="line0 title margin-left ">Friday</p>


      </div>

      <hr class="hr1 line" />

    <div class ="details">

      <div class="col">

        <img src="images/humidity.png"/>

        <div>

          <p class="speed">Humidity</p>

          <p class="humidity">50%</p>


        </div>

      </div>

      <div class="col">

        <img src="images/wind.png" />

        <div>

          <p class="speed">Wind Speed</p>

          <p class="wind">15 km/h </p>


        </div>

      </div>

    </div>

  </div>


</body>

hier mein Css code:

.backgroundimage {

  background-image: url('../images/sun_background.png');

  background-attachment: fixed;

  background-repeat: no-repeat;

  background-size: cover;

}

.cloud-background {

  background-image: url('../images/cloud.png');

  /* Füge hier die gewünschten Hintergrundbilderigenschaften hinzu */

}

.card {

  width: 90%;

  max-width: 470px;

  color: #fff;

  margin: 10px auto 0;

  border-radius: 20px;


}

.search{ 

  width: 100%;

  display: flex;

  align-items: center;

  justify-content: space-between;

}

.search input{

  border: 0;

  outline: 0;

  background: #ebfffc;

  color: #555;

  padding: 10px 25px;

  height: 60px;

  border-radius: 30px;

  flex: 1;

  margin-right: 16px;

  font-size: 18px;

}

.search button{

  border: 0;

  outline: 0;

  background: #ebfffc;

  border-radius: 60%;

  width: 60px;

  height: 60px;

  cursor: pointer;

}

.weather-icon{


  margin-bottom: -30px;

}

.weather h1 {

  font-size: 80px;

  font-weight: 500;

  color: floralwhite;

}

.weather h2 {

  font-size: 40px;

  font-weight: 400;

  margin-top: -10px;

  color: floralwhite;

}

.details {

  display: flex;

  align-items: center;

  justify-content: space-between;

  padding: 0 20px;

  margin-top: 50px;


}

.col {

  display: flex;

  align-items: center;

  text-align: left;

  margin-top: 150px;


}

  .col img {

    width: 20px;

    margin-right: 20px;

    margin-bottom: 70px

  }

.humidity, .wind{

  font-size: 28px;

  margin-top: -6px;

  color: floralwhite;

}

.speed{

  font-weight: bold;

}

.temp {

  margin-bottom: 20px;

  display: flex;

  justify-content: center;

}

.search button img{

  width: 55%;

}

.center {

  display: flex;

  justify-content: center;


}

.top-left{

  display: flex;

  justify-content:left 

}

.top-left

{

  margin-left: 10px;

}

.margin-top{

  margin-top: 20px;

}

.hr1 {

  width: 390px;

  height: 2px;

  color: black;

}

.line{

  margin-bottom: -100px;

  margin-top: 10px;

}

.line1{

  margin-top: 30px;

  margin-bottom: -20px;

}

.line0{

  margin-top: 70px;

  margin-bottom: -90px;

  font-size: 14px;

  font-weight: bold;

  color: black;

}

.imageline {

  margin-top: 5px;

  margin-bottom: -90px;


}

.imagesMain {

  padding: 0;

  margin-left: auto;

  margin-right: auto;

  margin-top: 20px;

  text-align: center;

}

  .imagesMain img {

    height: 400px;

    width: 300px;

    vertical-align: middle;

  }

.title {

  display: inline-block;

  color: lightgray;

}

.margin-left{

  margin-left: 14px;

}

Internet, App, HTML, CSS, Code, Programmiersprache, Webentwicklung
Hilfe beim html/css code?

Habe folgendes Problem, ich möchte die Website so umändern das sie für jedes gerät abrufbar ist bzw. verschiedene Display Größen.

Das ganze soll mit Flexboxen gemacht werden aber bei mir will das nicht so, unten ist mein backup code.

html:

<!DOCTYPE html>
<html lang="de">
  <head>
    <meta charset="UTF-8">
    <title>Fledermäuse</title>
    <link rel="stylesheet" href="formatieren.css">
  </head>
  <body>
    <header>
      <table>
        <tr>
          <td>
            <img src="bilder/Fledermaus_Logo.jpg" height="100" width="200" alt="Dieses Bild ist Nicht Verfügbar">
          </td>
          <td>
            <h1>Bat out of Hell</h1>
          </td>
        </tr>
      </table>
    </header>
    <nav>
        <p><a href="index.html" style="color: #b4b4b4">Start</a></p>
        <p><a href="verbreitung.html" style="color: #b4b4b4">Verbreitung</a></p>
        <p><a href="merkmale.html" style="color: #b4b4b4">Merkmale</a></p>


    </nav>
    <article>
      <h2><a href="https://de.wikipedia.org/wiki/Flederm%C3%A4use" style="color: #b4b4b4">Fledermäuse</a></h2>
      <p>
        Die <span class="fett">Fledermäuse</span> (Microchiroptera) sind eine
        <span class="magenta">Säugetiergruppe</span>, die zusammen mit den <span class="magenta">Flughunden</span> (Megachiroptera)
        die Ordnung der <span class="magenta">Fledertiere</span> (Chiroptera)
        bilden. Zu dieser Ordnung gehören die einzigen Säugetiere
        und neben den <span class="magenta">Vögeln</span> die einzigen <span class="magenta">Wirbeltiere</span>,
        die aktiv fliegen können. Weltweit gibt es rund 900 Fledermausarten.
      </p>
        Der Name bedeutet eigentlich „Flattermaus“
        (ahd. <span class="schräg">fledarmūs</span>, zu ahd. <span class="schräg">fledarōn</span> „flattern“)
    </article>
    <aside>
      <img src="bilder/Fledermaus_Skelett_Seite.jpg" width="200" alt="Dieses Bild ist Nicht Verfügbar">
    </aside>
    <footer>
      Der Inhalt dieser Webseite stammt von Wikipedia und ist vom Stand: 16. Dezember 2017, 7:25 Uhr.
    </footer>
  </body>
</html>

css:


header
{
  position: absolute		;
  top:      0px 			;
  left: 	0px				;
  width:    1200px			;
  height:   100px	 	   	;
  background-color: #3c3c3c	;
  font-family: Helvetica	;
  color: white 				;
}


nav
{
  position: absolute		;
  top: 	    100px			;
  left: 	0px		     	;
  width: 	200px			;
  height: 	550px		    ;
  background-color: #3c3c3c	;
  text-align: center 		;
  font-size: 25px			;
  font-family: Comic Sans MS ;
  color: white 				;
}


article
{
  position: absolute		;
  top: 		100px			;
  left: 	200px			;
  background-color: #616161	;
  overflow-y: scroll		;
  font-family: Arial		;
  color: white  			;
  font-size: 20px 			;
}


aside
{
  position: absolute		;
  top: 	    100px    		;
  left: 	1000px			;
  width: 	200px			;
  height: 	550px  			;
  background-color: #3c3c3c	;
}


footer
{
  position: absolute		;
  top: 		650px			;
  left: 	0px				;
  width: 	1200px			;
  height:   25px 			;
  background-color: black	;
  color: white 				;
}


.fett
{
	font-weight: bold;
}


.magenta
{
	text-decoration: underline;
	color: magenta;
}


.schräg
{
	font-style: oblique;
}
HTML, CSS, Programmiersprache

Meistgelesene Fragen zum Thema HTML